Motorcycle touring is a cinematic experience by nature—a high-definition blur of dramatic landscapes, grit, and raw human emotion. However, there is a massive gap between seeing a moment and capturing it. Where every rider is a potential storyteller, the goal isn’t just to take “pretty pictures,” but to document the feeling of the wind and the scale of the mountains. Mastering moto-photography requires a delicate balance of technical skill, creative composition, and—most importantly—uncompromising safety.Motorcycle journeys are filled with dramatic landscapes, raw emotion, and thrilling moments. But capturing these on camera isn’t always easy. Here’s how to do it right — from choosing the right gear to composition, safety, and editing tips.
The Creator’s Toolkit
To capture the “Road to the Clouds,” you need a gear strategy that doesn’t slow down your ride:
- The Action Cam (The POV): Your primary tool for “immersion.” Whether mounted on your chin or the handlebar, action cameras (like the latest GoPro or Insta360) capture the visceral thrill of lean angles and water crossings.
- The Smartphone (The Speedster): Modern mobile sensors are now powerful enough for 90% of your shots. Keep it in a vibration-dampened mount or an easy-access pocket for quick “roadside pulls.”
- The Drone (The Scale): Nothing communicates the vastness of the Spiti loops or the Gata Loops like an aerial shot. In 2026, compact “follow-me” drones have become the standard for solo riders.
- The Mirrorless (The Art): If you are serious about your blog or channel, a compact mirrorless camera with a versatile 24-70mm lens is your best friend for low-light campfires and high-detail portraits.
Composition: Moving Beyond the “Bike-in-Front” Shot
Don’t just park your bike and click. To tell a story, vary your perspectives:
- The “Sense of Scale”: Position your bike or a fellow rider in the bottom third of the frame against a massive Himalayan peak. This emphasizes how small we are against nature.
- Leading Lines: Use the road itself—the curves, the painted lines, or even a row of prayer flags—to lead the viewer’s eye toward the horizon.
- The “Human” Element: Some of the best tour photos aren’t of bikes. They are of the dust on a rider’s face, the steam rising from a cup of tea, or the interaction with a local shepherd. This adds emotion to the adventure.
The “Safety First” Photography Rule
The “One-Stop” Protocol: Never try to film or photograph while riding unless you are using a hands-free action cam. Fiddling with a phone or camera at 14,000 feet on a gravel path is a recipe for a “low-side” crash.
- Pro Tip: If you see a shot you love, pull over completely. If the terrain is too narrow or dangerous to stop, let the shot go. No photo is worth a dropped bike or a broken lever.
Editing for Impact: The Final Polish
“Over-editing” is out; “Authenticity” is in.
- Color Grade for Mood: Enhance the deep blues of the high-altitude sky and the earthy tones of the terrain, but keep the skin tones natural.
- Sound is 50% of Video: If you’re vlogging, use a “Dead Cat” (wind muff) on your mic. The sound of a crisp engine note or the local wind is more powerful than any background music.
The Creator’s Arsenal: Choosing the Right Gear
In motorcycle touring, your gear must be a balance of portability, durability, and accessibility. The Himalayas are a brutal environment—vibrations, fine dust, and sudden rain can destroy high-end electronics in hours. Your toolkit shouldn’t just take great photos; it needs to survive the journey and be reachable within seconds. If your camera is buried at the bottom of a saddlebag, you won’t use it.
The Recommended Gear Tier
Depending on your content goals, here is how to structure your kit:
A. The Daily Workhorse: High-End Smartphones
(iPhone 15+, Pixel 8+, Samsung S24/25 series)
- The Advantage: Best for “instant” storytelling and social media. With advanced computational photography and 2026-era stabilization, they are often all you need for 80% of your travel shots.
- Best Use: Quick roadside captures, portraits, and vertical video for Reels/Shorts.
B. The Point-of-View (POV) Experts: Action Cameras
(GoPro Hero 12+, Insta360 X4, DJI Osmo Action 4/5)
- The Advantage: These are built for the ride. They are waterproof, shockproof, and can be mounted on your helmet, crash guards, or handlebars.
- Best Use: Capturing the “vibe” of riding—water crossings, leaning into corners, and 360-degree perspectives that allow you to “re-frame” the shot after the ride is over.
C. The Artistic Master: Mirrorless Cameras
(Sony Alpha 7C/6700, Fujifilm X-T5, Canon R series)
- The Advantage: Professional-grade depth of field and superior low-light performance.
- Best Use: Landscapes at sunrise/sunset, high-quality “Hero” shots of the bike, and documentary-style photography of local cultures.
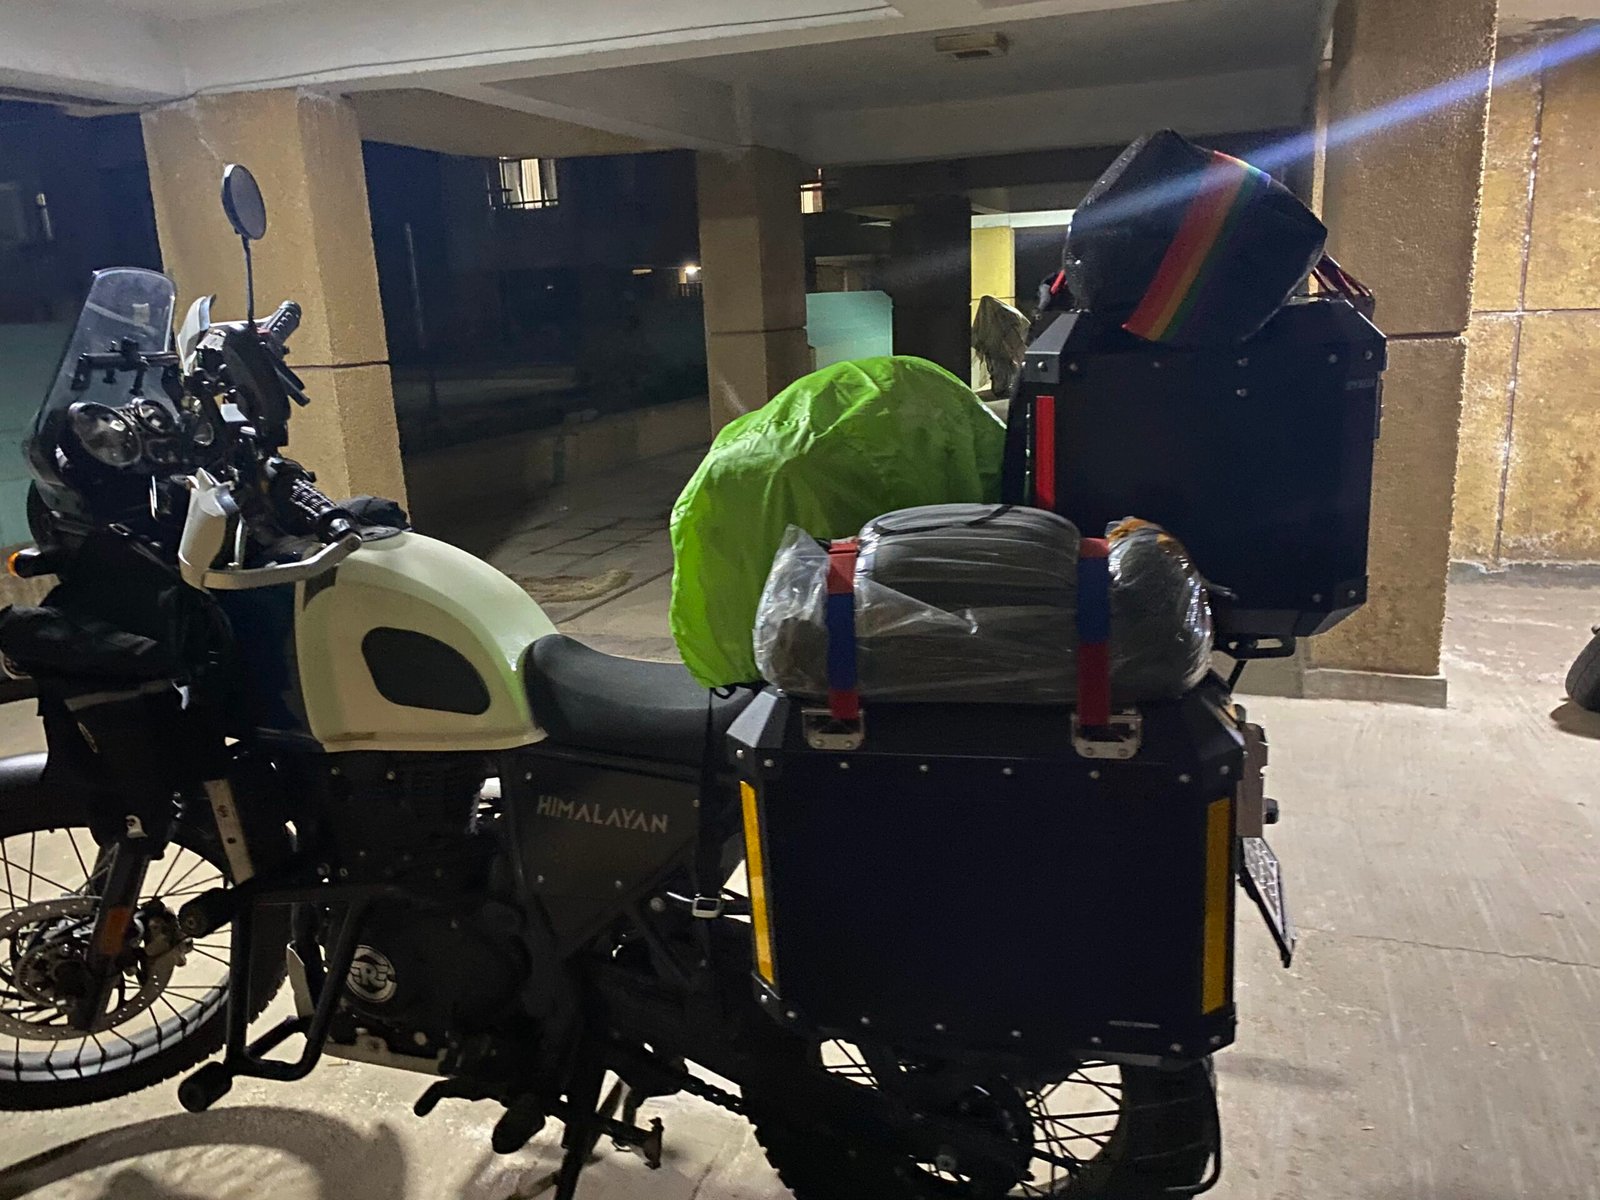
Essential Accessories for the Road
| Accessory | Why It’s Non-Negotiable |
| Padded Tank Bag | Protects your gear from engine vibrations while keeping it literally between your arms for quick access. |
| ND Filters | Essential for “Cinematic Motion Blur.” Without these, high-altitude sun is too bright, making your videos look choppy. |
| GorillaPod / Mini Tripod | Allows you to wrap your camera around a handlebar or a tree branch for solo “ride-by” shots. |
| Lens Cleaning Kit | Dust is your #1 enemy. A micro-fiber cloth and a small blower are mandatory every time you stop. |
| The “Power Bank” Rule | Cold mountain air drains batteries 30% faster. Always carry 2-3 extra batteries and a high-capacity power bank. |
Pro-Tip : The “Vibration” Warning
High-frequency engine vibrations can permanently damage the Optical Image Stabilization (OIS) in modern smartphones.
- The Fix: If you mount your phone on the handlebar for navigation, always use a vibration-dampening mount (like those from QuadLock or Peak Design). For your “main” camera, keep it in a padded bag rather than a rigid plastic mount.
Mounting Strategy: Mastering the Geometry of Motion
Static photos tell where you were, but motion shots tell how it felt. In 2026, the “cinematic” look of a motorcycle tour comes from varied perspectives. Mounting your camera isn’t just about sticking it anywhere; it’s about choosing angles that emphasize speed, scale, and the mechanical dance of the bike. However, a mount is only as good as its security—a loose camera is a projectile that can lead to gear loss or a dangerous distraction.
The “POV Hierarchy”
To create a professional-grade edit, you need to mix and match these specific perspectives:
- The Immersive “Pilot” View (Helmet Mount):
- Chin Mount (Recommended): By 2026, chin mounting has become the standard for “vlog-style” content. It captures the handlebars, the speedometer, and the road exactly as you see it, providing the most immersive experience for the viewer.
- Side/Top Mount: Great for “first-person” perspectives, but be wary of wind drag at higher speeds.
- The Mechanical “Cockpit” View (Handlebar Mount):
- This is your “steady” shot. It’s perfect for capturing the road unfolding ahead. Pro Tip: Include a bit of the front tire or the instrument cluster in the frame to provide a sense of speed and context.
- The Rugged “Grit” View (Chest Mount):
- The chest mount is the most stable position because your body acts as a natural shock absorber. This is the “gold standard” for off-roading in Spiti or Sikkim, as it captures your arm movements and the bike’s reaction to the terrain without the “head-shake” of a helmet mount.
- The “Vanishing Point” (Tail/Pillion Mount):
- Mounting a camera (especially a 360° cam) on the rear allows you to capture the stunning landscapes you’ve just traversed. It also allows for “Third-Person” shots that make it look like a drone is following you.
The Safety Protocol: “Click, Tug, Ride”
In the vibration-heavy environment of a motorcycle, gear failure is a real threat. Follow this Three-Step Check every morning and at every tea break:
- The Tug Test: Physically pull on every mount. If there is even a millimeter of “play,” tighten the thumb screws or check the adhesive.
- The Tether Rule: Always use a safety tether (a thin steel or nylon cord) connecting your camera to a fixed point on the bike or helmet. If the mount snaps, the tether saves your expensive gear from hitting the asphalt.
- The “Set it and Forget it” Rule: Adjust your angles before you put on your gloves. Never try to adjust a camera angle while the bike is in motion.
Pro-Tip : The “360° Advantage”
If you are using a camera like the Insta360 X4, the mount position matters less than the “Invisible Selfie Stick.” By mounting it on your crash guards or a tail-extender, you can “digitally” move the camera in post-production. It’s like having a dedicated camera operator riding alongside you.
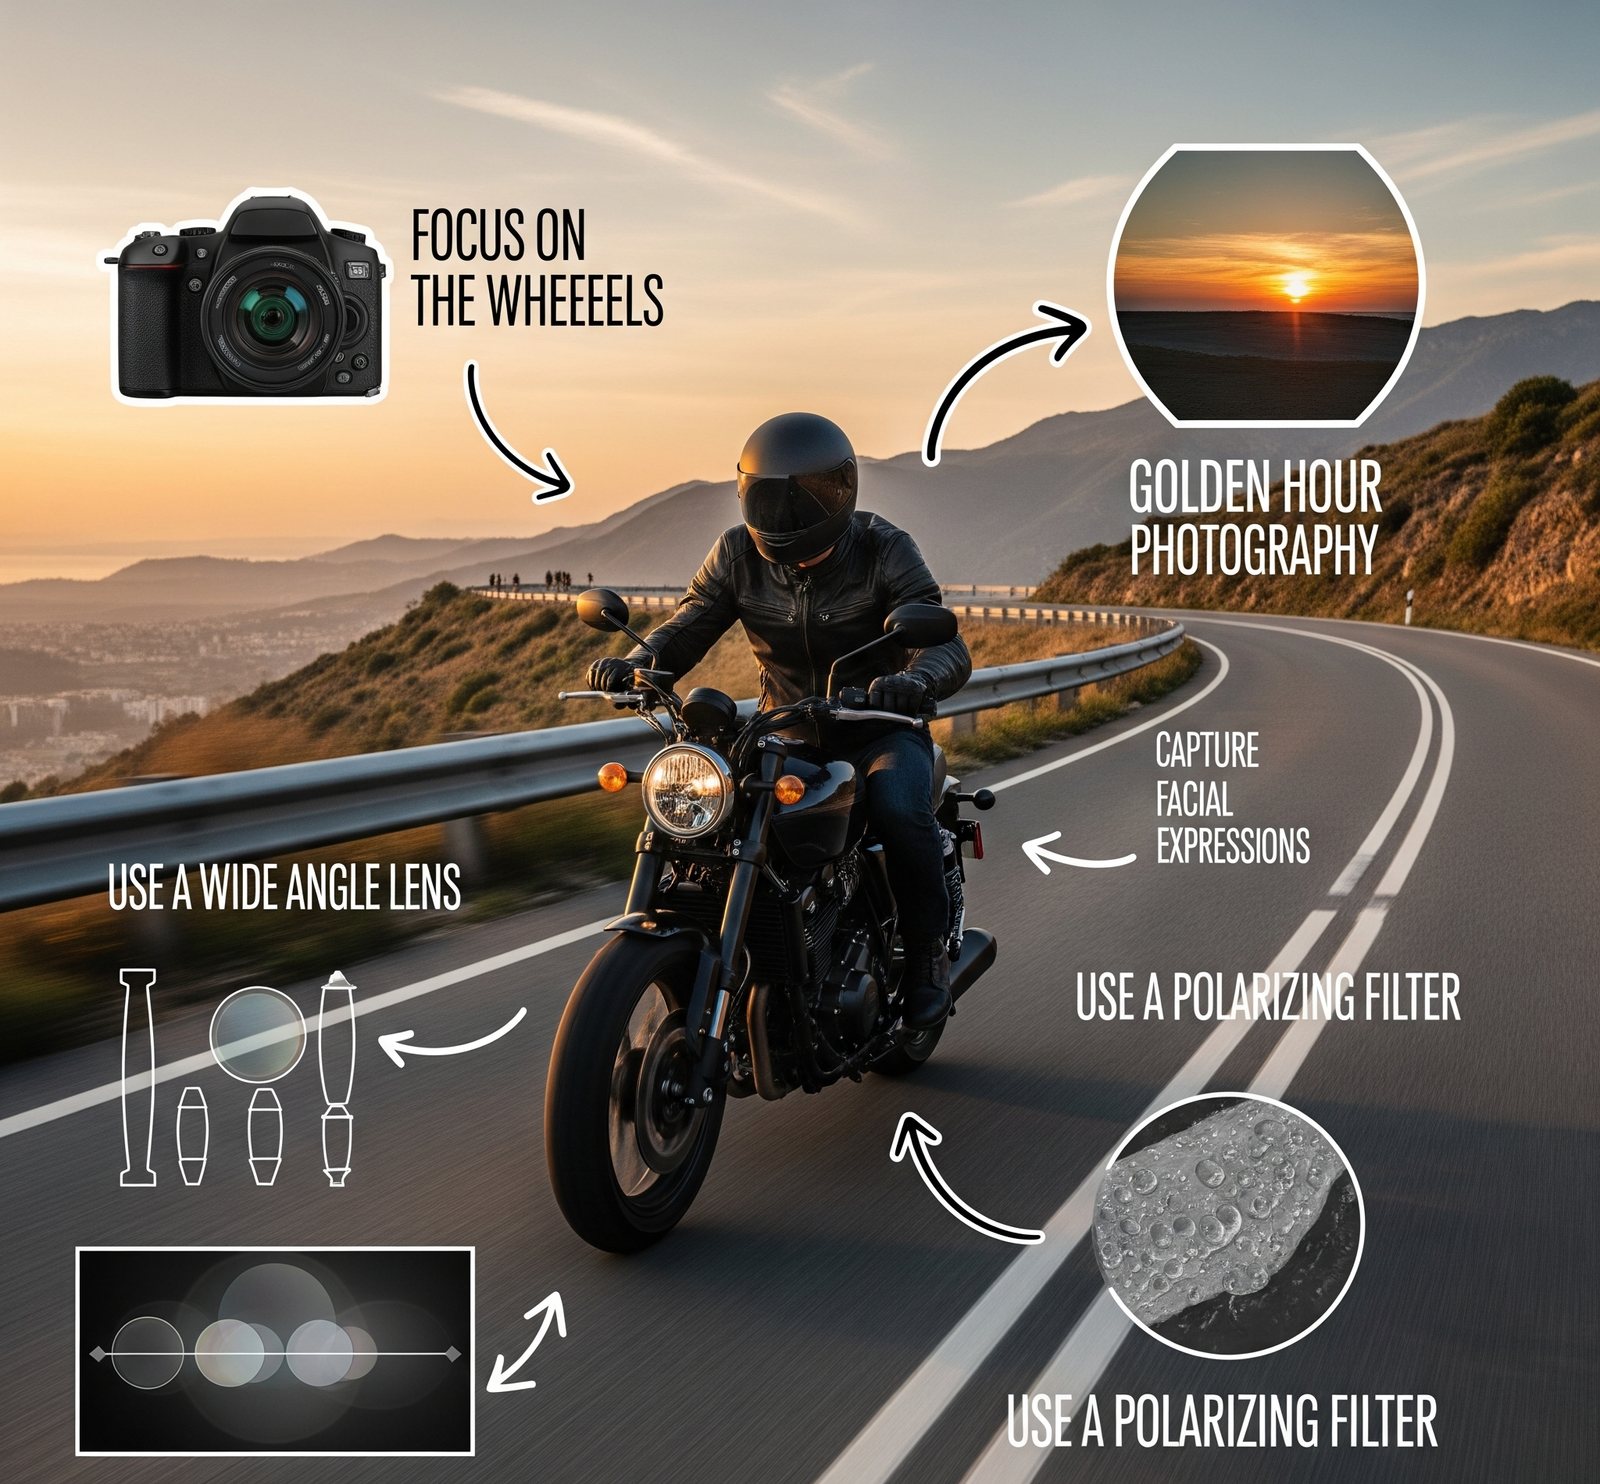
Lighting: Painting with the High-Altitude Sun
In the high-altitude deserts of Ladakh or the misty valleys of Sikkim, light is your most powerful storytelling tool. Because the atmosphere is thinner at 15,000 feet, the sun is significantly harsher and more “binary”—the highlights are brighter, and the shadows are deeper. Understanding the “Solar Clock” is the difference between a washed-out, amateur snapshot and a cinematic masterpiece that captures the true mood of the mountains.
The 2026 Lighting Playbook
To get that “professional” look, you have to plan your riding days around the sun’s position.
1. The Golden Hour (The “Hero” Light)
- When: 1 hour after sunrise or 1 hour before sunset.
- The Vibe: Everything turns to gold. The long, soft shadows add “texture” to the road and depth to the mountains.
- Pro Tip: This is the best time for “Backlit” shots. Position the sun behind your motorcycle to create a glowing silhouette or “rim lighting” around the edges of the bike and your helmet.
2. The Blue Hour (The “Moody” Expedition)
- When: The 20-30 minute window just before sunrise or immediately after sunset.
- The Vibe: Deep blues, purples, and cool tones. It creates a sense of “The Great Unknown” and cold endurance.
- Best Use: Use this time to photograph your campsite or the bike’s headlights cutting through the twilight. It’s perfect for capturing the “raw” and “rugged” side of touring.
3. The “Overcast” Gift (The Natural Softbox)
- When: Cloudy or foggy days.
- The Vibe: Flat, even, and flattering. Most riders hate cloudy days, but photographers love them.
- Best Use: This is the perfect time for Portraits and Close-ups. Without the sun squinting your eyes or creating dark shadows under your helmet’s visor, you can capture the “raw emotion” on a rider’s face or the fine mechanical details of the engine.
The “Mid-Day” Trap (and how to fix it)
Between 11:00 AM and 3:00 PM, the sun is directly overhead. In the Himalayas, this light is brutal—it makes the landscape look flat and creates “racoon eyes” (dark shadows) inside your helmet.
- The Fix: Use ND (Neutral Density) Filters. Think of them as sunglasses for your camera. They allow you to maintain a lower shutter speed even in the blinding mid-day sun, preventing your video from looking “choppy” and keeping your colors from being “blown out.”
Pro-Tip : The “Altitude Glow”
The sky at high altitudes is a much darker, richer blue than at sea level. To capture this effectively, try to keep the sun at a 90-degree angle to your camera. This will polarize the sky naturally, making the clouds pop and the blue look incredibly deep without any editing.
Composition Tips for Better Photos
Why it matters: Composition is the secret sauce that turns snapshots into great photos.
Quick Tips:
- Rule of Thirds: Place your subject off-center to create balance.
- Leading Lines: Use roads, fences, or shadows to guide the viewer’s eye to your motorcycle.
- Foreground Interest: Include rocks, grass, or your helmet to add depth.
- Frame the Subject: Use trees, arches, or tunnels to create natural frames around your bike or fellow riders.
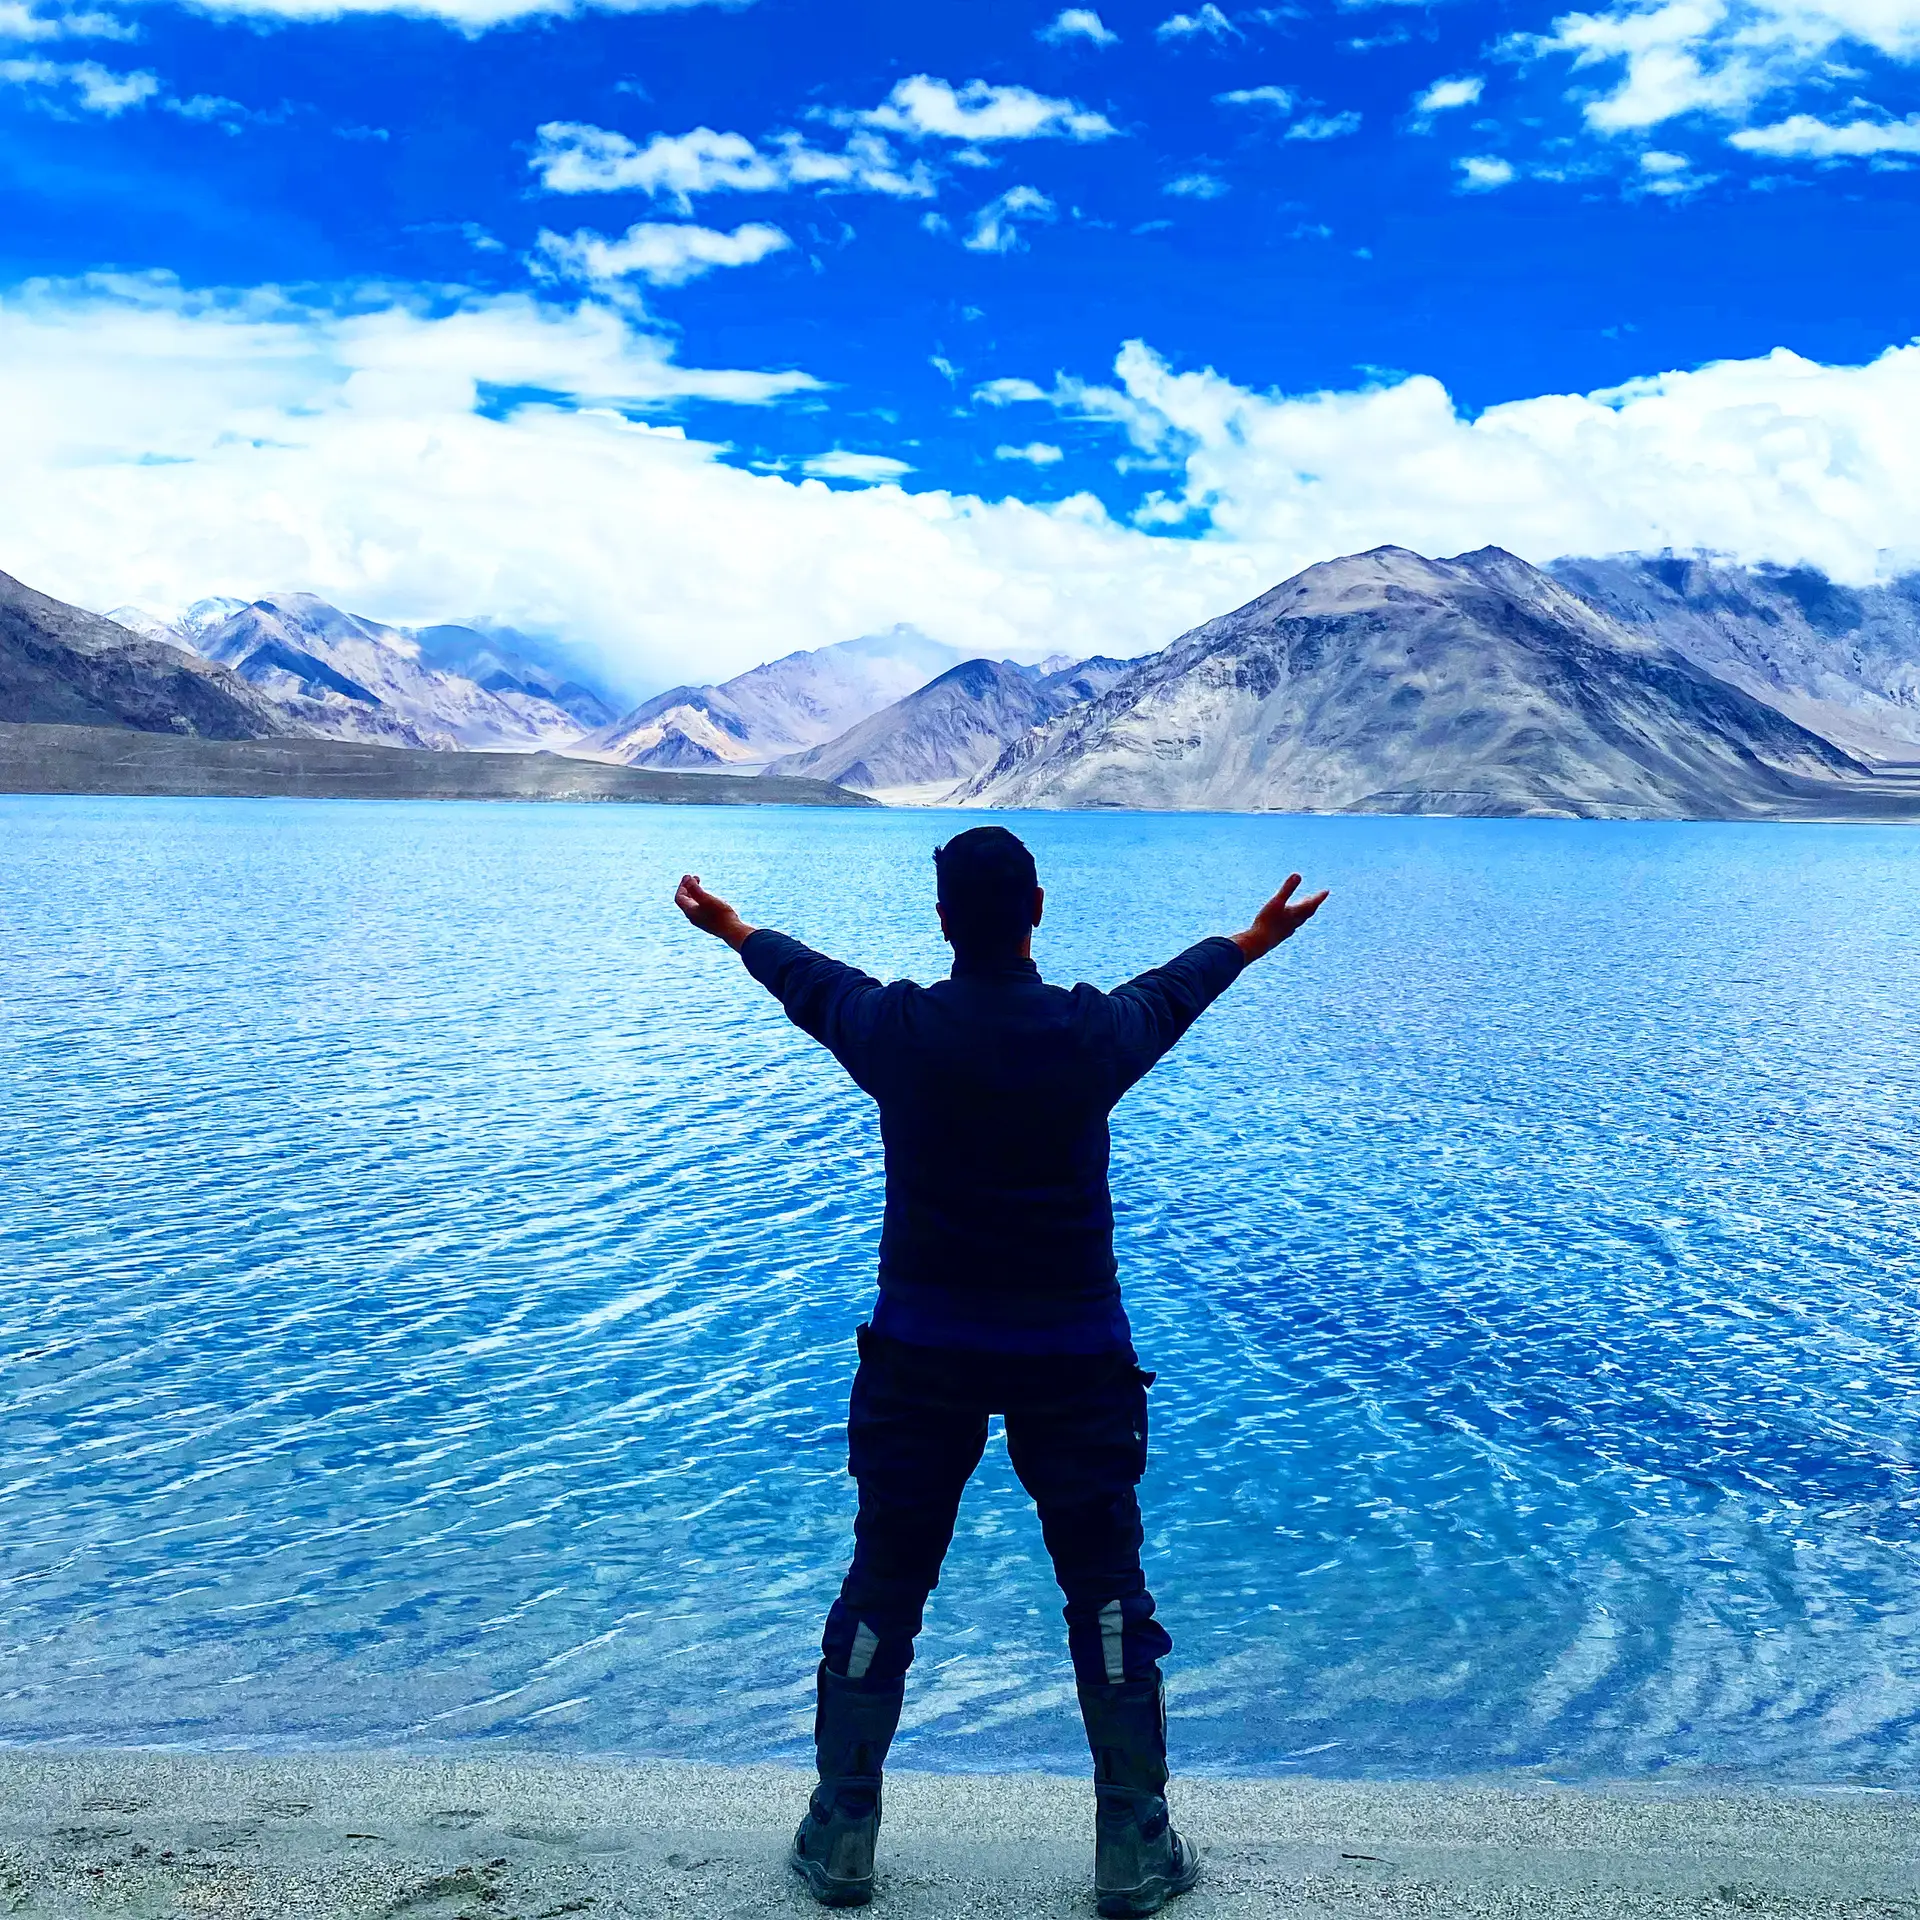
- Silhouettes: Place your bike or rider in front of a strong backlight (sunrise/sunset) for dramatic effects.
Practice framing your shots consciously — don’t just point and shoot.
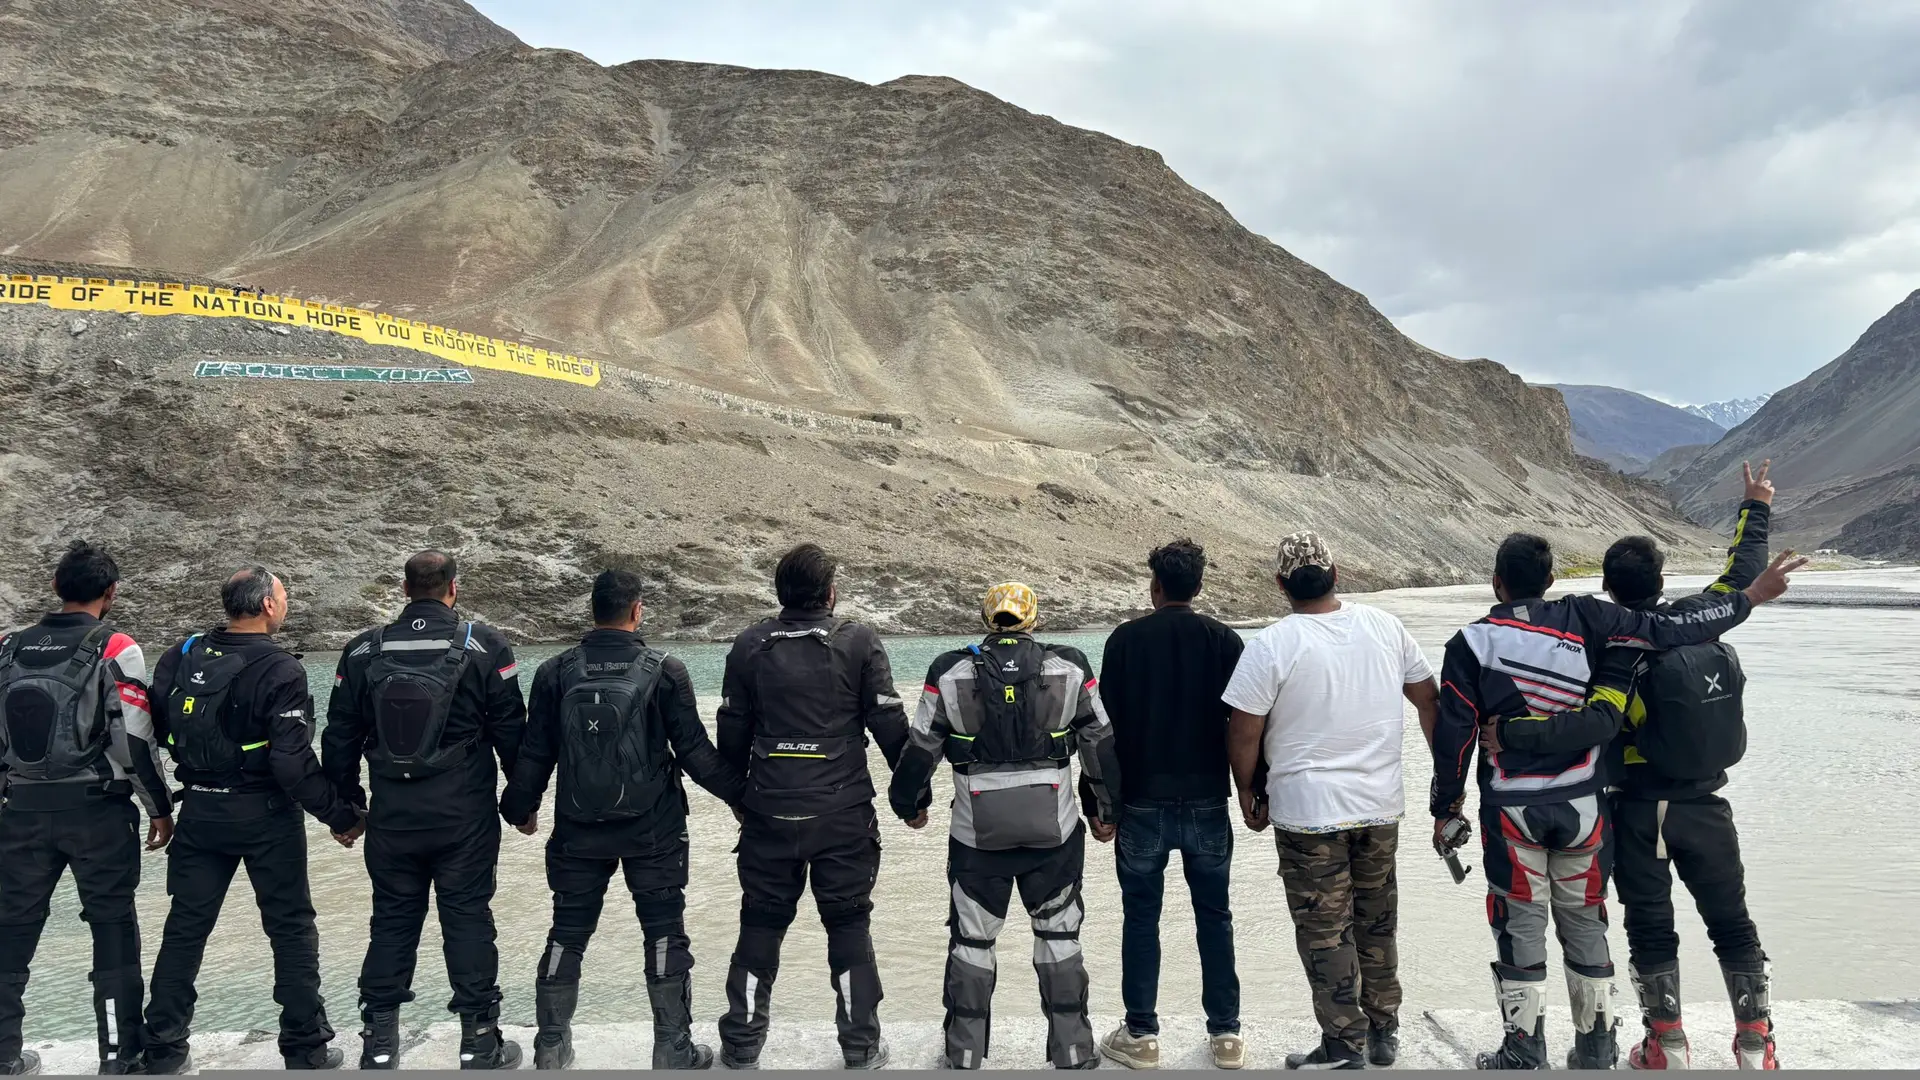
Include People & Emotions
Why it matters: Your tour is not just about the machine or landscape — it’s about human experience.
Tips:
- Capture rider expressions, candid moments at dhabas, fueling up, or fixing a puncture.
- Take group photos at borders, signboards, and landmarks.
- Shoot self-portraits using tripods with timers or remote triggers.
This adds narrative, emotion, and relatability to your travel album.
Safety First, Always
Why it matters: Great photos aren’t worth risking injury or damage.
Best Practices:
- Never shoot while riding alone. Ask a friend or use mounts.
- Pull over at a safe place before using handheld cameras or phones.
- Avoid obstructing roads — use lay-bys or wide shoulders.
- Always be visible to traffic when setting up shots.
Prioritize safety over social media likes.
Editing Makes a Difference
Why it matters: Editing helps bring out the full potential of your images.
Mobile Apps:
- Snapseed: Best for quick, high-quality edits.
- Lightroom Mobile: Professional-grade control.
- VSCO / Prisma: Creative filters and styles.
Key Adjustments:
- Brightness/Exposure
- Contrast & Clarity
- Crop for better composition
- Color temperature (warm/cool)
- Remove distractions using healing/clone tools
Be subtle. Let the photo tell the story — don’t overprocess it.
Tell a Story Through Photos
Why it matters: A trip album should be more than a folder of pretty pictures — it should say something.
Photo Story Checklist:
- Starting the journey: packed bike, GPS loaded, ready face.
- On the road: wide-angle road shots, candid rider moments.
- Landmarks and culture: local people, food, unique sights.
- End-of-day fatigue: dusty boots, sunset over the tent, tired smiles.
- Closing shot: reached destination, group high-fives or sunset with bike silhouette.
Sequence your photos into a story arc — start, middle, climax, end.
Care for Your Equipment on the Road
Why it matters: Dust, water, and vibrations are constant threats on a motorcycle tour.
Protection Tips:
- Keep silica gel packs in camera bags to reduce moisture.
- Use zip-locks or dry bags to store electronics during rains.
- Clean lenses daily — even your phone’s camera gets dusty fast.
- Wrap cameras in microfiber cloths while packing.
Tip: Avoid changing lenses in windy or dusty environments.
Geotag & Share Your Ride
Why it matters: Geotagging helps you track your route, share your journey, and revisit favorite spots.
Tools:
- Relive App / Google Timeline: Auto-log photos by location.
- Instagram + Hashtags: Use location tags + #MotorcyclePhotography, #RiderLife.
- Photo Map Tools: Apps like “Travel Mapper” allow photo plotting on custom maps.
Bonus: Create a “Photo Route Map” on your website for followers to relive your journey.
Optional: Upgrade Your Skills
- Take online courses in photography basics (Udemy, Skillshare).
- Follow photographers like @ItchyBoots, @KTMAdventure, @MotorcyclistMag.
- Join forums or local photography rider groups to practice and learn.
I hope this comprehensive guide has provided you with the clarity and confidence needed to kickstart your motorcycling journey. My goal is to help you navigate the steep learning curve of the road so you can focus on what truly matters: the joy of the ride.
If you found these insights helpful, there is much more to explore. From deep dives into specific gear reviews to tactical route planning and advanced riding techniques, I’ve curated a wealth of knowledge to keep you moving forward.
Take the Next Step: For more expert tips, gear breakdowns, and adventure stories, be sure to explore our full library of resources on the Guides Page and Blogs Page.
Related Posts
First Motorcycle Tour – Do’s and Don’ts
Master the Basics: The Blueprint for Your First Expedition Your…
The Ultimate Guide to Leh-Ladakh Motorcycle Trip
Conquer the Himalayas Like a Pro Rider Leh-Ladakh is more…
The Great Debate: Solo Exploration vs. Collective Adventure
Motorcycle touring is a deeply personal endeavor, often serving as…